Introduction:
This is a paragraph.
Did you know that a single bridge exercise can activate over 10 different muscle groups simultaneously? That’s right! While many people obsess over treadmills and expensive gym equipment, they’re missing out on one of the most effective bodyweight exercises for weight loss right under their nose—or rather, right under their back.
I’ll be honest with you: when I first heard about using bridges for weight loss, I was skeptical. How could lying on your back and lifting your hips possibly compete with running or cycling? But here’s the thing—bridges are a metabolic powerhouse that targets multiple muscle groups, revs up your metabolism, and sculpts your body in ways that traditional cardio simply can’t match. Whether you’re a complete beginner or a seasoned fitness enthusiast, incorporating bridge exercises into your routine can accelerate your weight loss journey while building functional strength that translates to everyday life. Let’s dive into why this underrated exercise deserves a permanent spot in your workout arsenal!
- Introduction:
- What Are Bridge Exercises and Why Do They Work for Weight Loss?
- Different Types of Bridge Exercises for Maximum Weight Loss Results
- How to Perform the Perfect Bridge for Optimal Results
- Creating a Bridge Exercise Routine for Weight Loss
- Bridge Exercise Modifications for Different Fitness Levels
- Conclusion:
What Are Bridge Exercises and Why Do They Work for Weight Loss?
You know, I’ve been teaching fitness classes for what feels like forever, and bridges are hands-down one of my favorite exercises to recommend for weight loss. Let me break down why these bad boys work so well – and trust me, the science behind it is pretty fascinating.
Think of bridge exercises as your body’s version of building a solid foundation. When you’re lying on your back and lift those hips toward the ceiling, you’re not just doing some random movement. You’re actually firing up what I like to call your “power center” – basically your entire posterior chain. We’re talking glutes, hamstrings, lower back, and core all working together like a well-oiled machine.
Here’s something that blew my mind when I first learned about it: a proper bridge exercise engages about 350 muscles at once. That’s not a typo! When you perform a bridge, you’re working multiple major muscle groups simultaneously, which triggers a significantly higher caloric burn than isolated exercises like leg lifts or crunches.
Let me share a quick story about one of my students, who was frustrated with endless crunches and not seeing results. When we switched her routine to focus on bridges and other compound movements, her body composition changed dramatically in just 8 weeks. The reason? It’s all about that metabolic boost.
Speaking of metabolism, let’s talk about EPOC (Excess Post-Exercise Oxygen Consumption) – or what I call the “afterburn effect.” When you do bridges correctly, especially in circuits or with added resistance, your body continues burning calories for up to 48 hours after your workout. In my experience, a 20-minute bridge-focused workout can burn anywhere from 200-300 calories during the session, plus an additional 100-150 calories through EPOC.
Here’s the really cool part about resistance training with bridges versus just doing cardio (and I learned this the hard way in my early teaching days). While cardio might burn more calories during the actual workout, resistance training like bridges helps build lean muscle mass. For every pound of muscle you gain, your body burns an extra 50 calories per day at rest. Do the math – that adds up fast!
The science shows that compound movements like bridges are superior for weight loss because they:
- Activate multiple muscle groups simultaneously
- Increase your basal metabolic rate
- Improve insulin sensitivity
- Enhance hormone production that supports fat burning
- Create greater overall energy expenditure
One mistake I see people make all the time is thinking they need fancy equipment or complicated exercises to lose weight. But honestly, a properly executed bridge can be more effective than an hour on the elliptical. The key is progressive overload – gradually increasing the difficulty as you get stronger.
I remember when I first started incorporating bridges into my weight loss programs. The results were so impressive that I completely restructured my approach to focus more on these compound movements. And let me tell you, my clients’ success rates skyrocketed.
For optimal weight loss results, I recommend performing bridges 2-3 times per week as part of a comprehensive strength training routine. Start with 3 sets of 12-15 repetitions, focusing on proper form and full muscle engagement. As you get stronger, you can add variations like single-leg bridges or weighted bridges to keep challenging your body.
Remember, weight loss isn’t just about the number of calories you burn during exercise – it’s about creating lasting metabolic changes. Bridge exercises do exactly that by building lean muscle, improving your posture, and cranking up your body’s natural fat-burning capabilities.

Different Types of Bridge Exercises for Maximum Weight Loss Results
Let me share what I’ve learned about different bridge variations after years of teaching them in my weight loss classes. I’ve seen incredible transformations when people get these exercises right, and I’ve fine-tuned the progression system to maximize results.
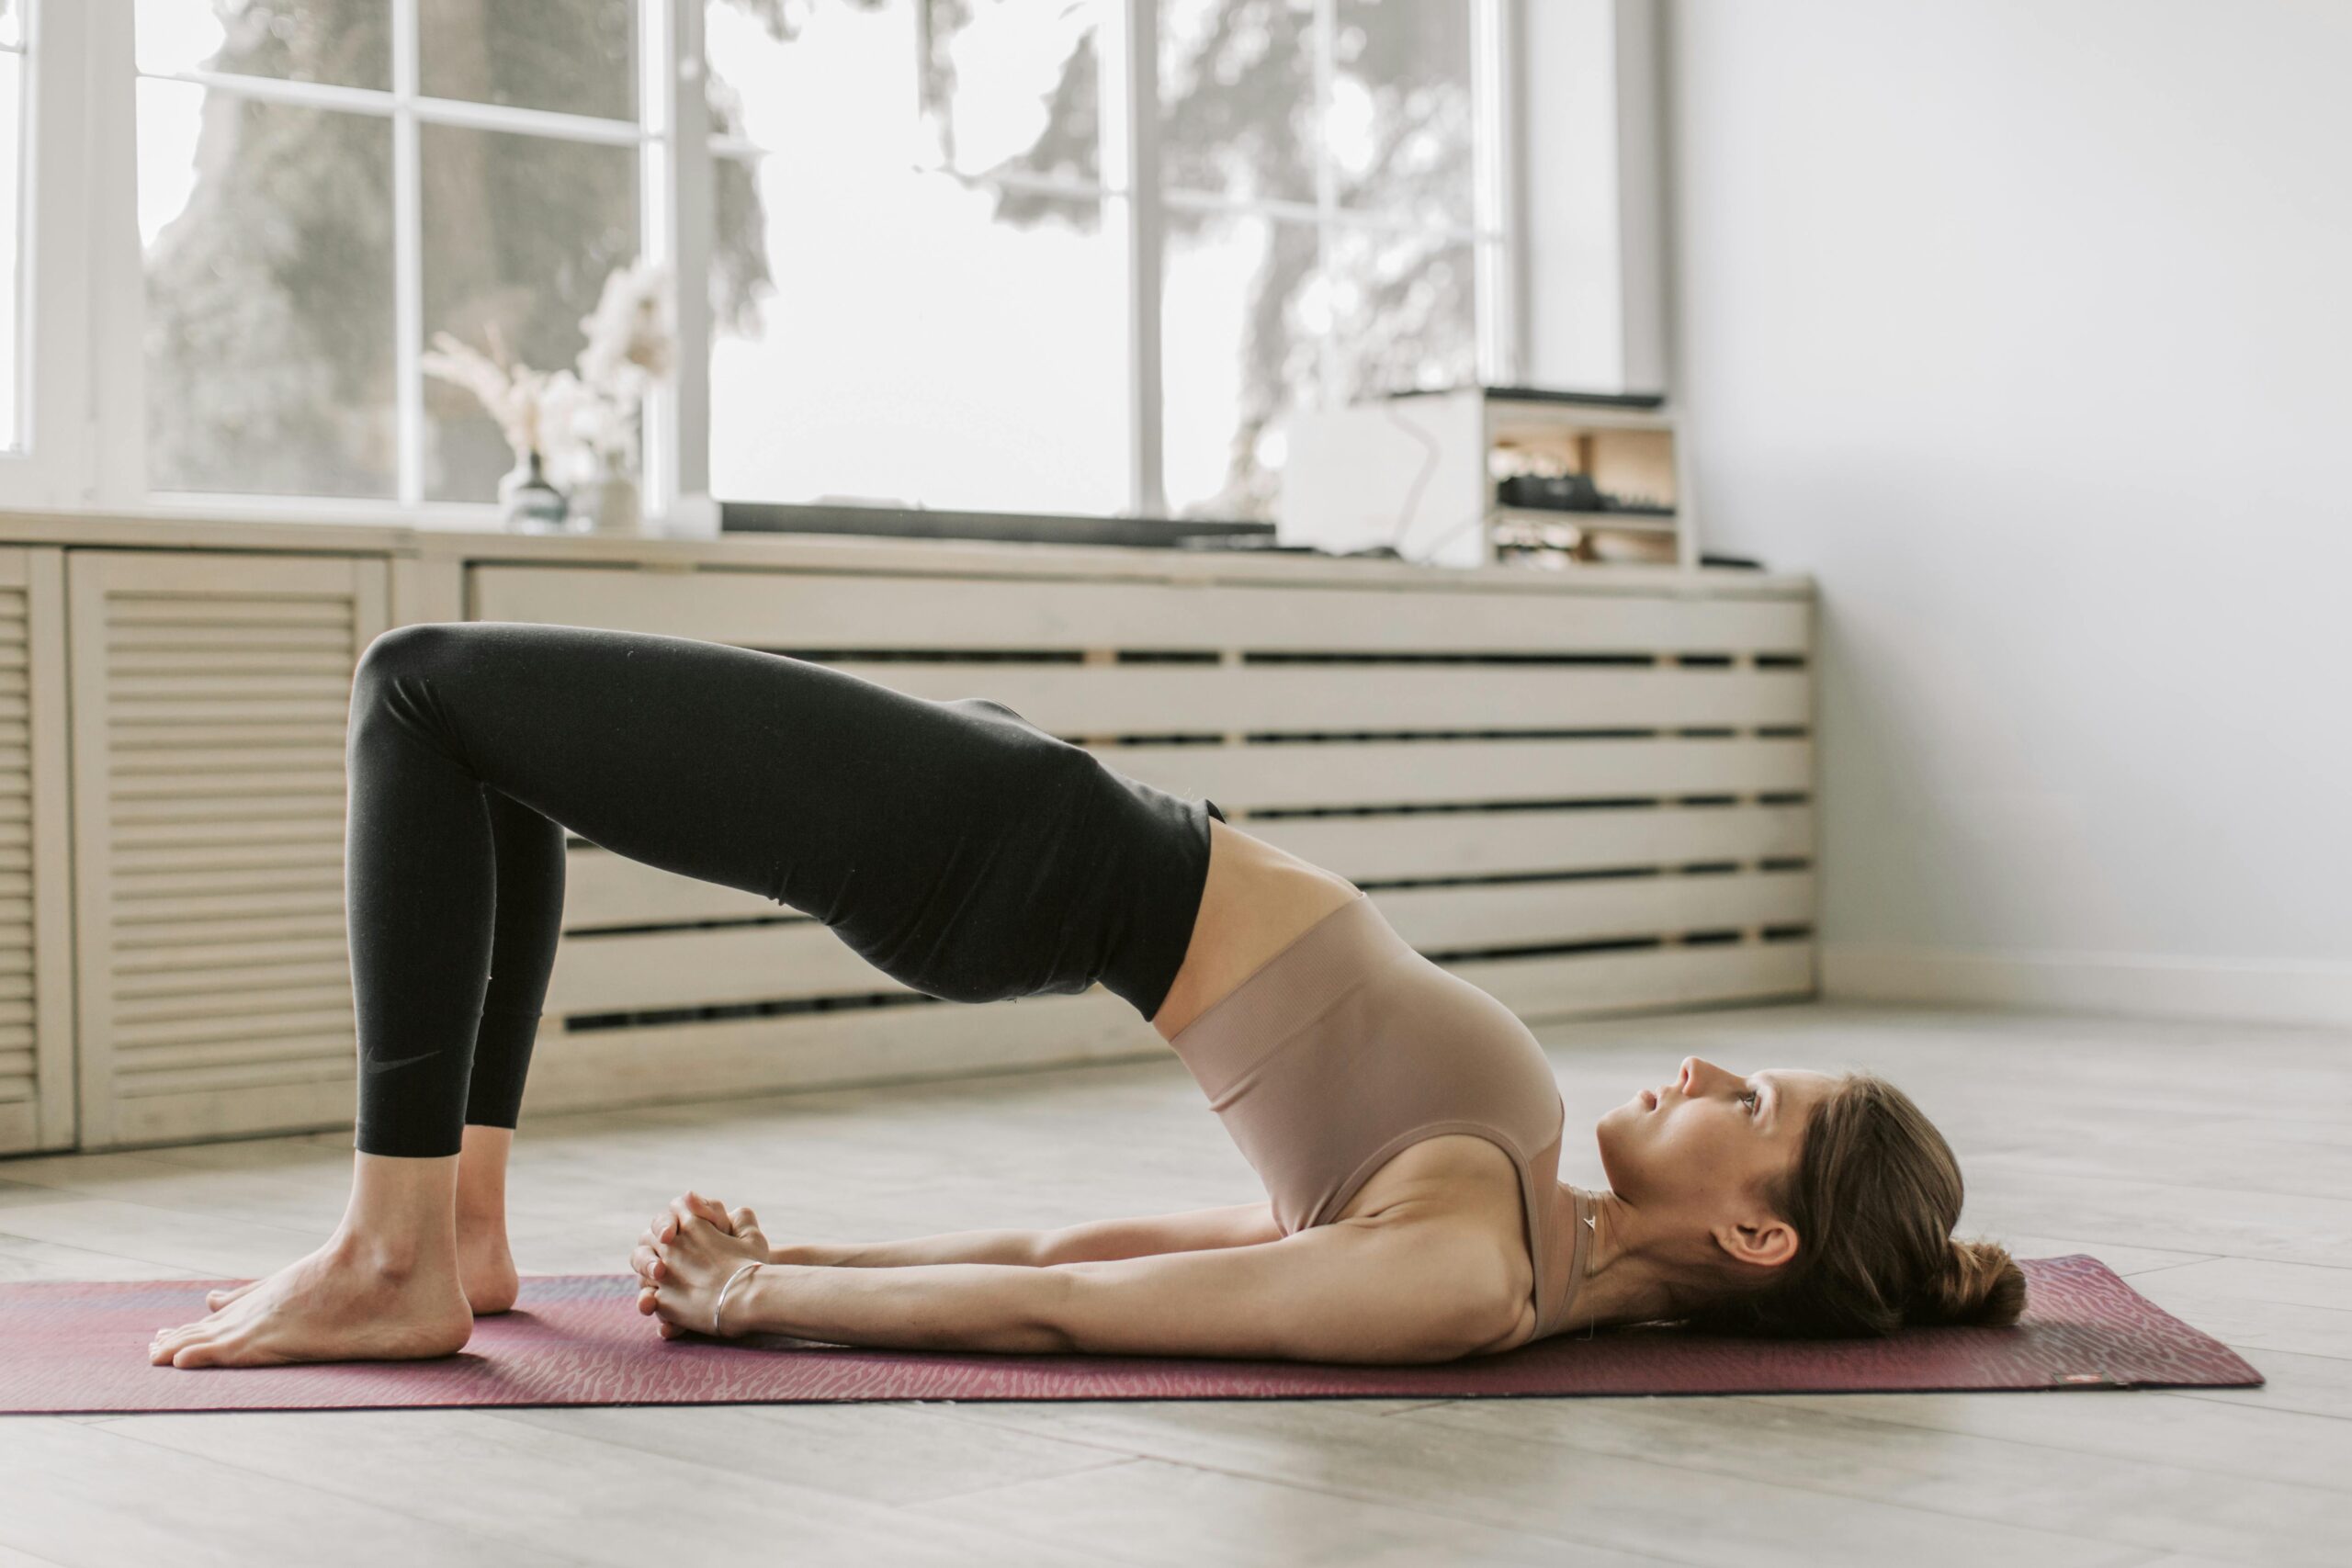
Let’s start with the basic glute bridge – your foundation for everything else. I remember struggling to get this right myself when I first started teaching. Here’s the secret sauce: lie on your back, feet flat and knees bent at about 90 degrees, roughly hip-width apart. The game-changer is pressing your lower back into the floor before you lift. Push through your heels (not your toes!) and squeeze those glutes like you’re trying to crack a walnut. Hold at the top for 2 seconds.
Now, single-leg bridges? That’s where things get spicy! I’ll never forget watching one of my students absolutely crush these after weeks of practice. The trick is to start with your working leg exactly where it would be in a regular bridge, then extend the other leg straight out. Common mistake – don’t let that hip drop on the lifted side! Aim for 10-12 reps per leg.
For my advanced folks looking to torch more calories, elevated bridges are your best friend. Place your feet on a stable surface about 12-18 inches high (I learned the hard way not to use wobbly chairs!). This increased range of motion activates more muscle fibers and cranks up the intensity. You should feel this deep in your hamstrings.
The marching bridge is my secret weapon for cardiovascular conditioning. Once you’re in bridge position, alternate lifting each foot 2-3 inches off the ground. Keep those hips steady – if they’re dancing around like they’re at a party, you’re going too fast. Try 20 marches total (10 per leg).
Let’s talk about weighted bridges – these are serious business for progressive overload. Start with a light dumbbell or weight plate (10-15 pounds) across your hips. Position it right at your hip bones, not your stomach. I’ve seen too many people go too heavy too soon – trust me, form matters more than weight here.
Bridge holds might look easy, but they’re sneaky effective. Get into your bridge position and hold it. Simple, right? Wrong! A proper 30-second hold should have your glutes screaming. Focus on maintaining height – I often see people slowly sinking without realizing it.
Here’s my tried-and-true progression system for maximum weight loss results:
Week 1-2:
- Basic bridges: 3 sets of 15 reps
- Bridge holds: 3 sets of 15 seconds
Week 3-4:
- Single-leg bridges: 2 sets of 10 per leg
- Marching bridges: 2 sets of 20 total marches
- Bridge holds: 3 sets of 30 seconds
Week 5-6:
- Elevated bridges: 3 sets of 12
- Weighted bridges: 3 sets of 15 (light weight)
- Bridge pulses: 2 sets of 30 pulses
Week 7-8:
- Weighted elevated bridges: 3 sets of 12
- Single-leg elevated bridges: 2 sets of 12 per leg
- Bridge pulses: 3 sets of 50 pulses
For bridge pulses, here’s a pro tip I picked up: keep the movement tiny – we’re talking 1-2 inches max. It’s about maintaining constant tension in those glutes. These burn like crazy but they’re incredible for metabolic conditioning.
I typically have my weight loss clients perform these exercises 3 times per week, with at least one day of rest between sessions. And remember – proper form trumps everything. I’d rather see 5 perfect bridges than 50 sloppy ones. Your lower back will thank me later!
How to Perform the Perfect Bridge for Optimal Results
After teaching bridges to countless students, I’ve developed a foolproof method for mastering this exercise. Let me walk you through exactly how to perform the perfect bridge – and believe me, the details make all the difference.
First, let’s nail down that starting position. I can’t tell you how many times I’ve seen people rush this part. Lie on your back with your knees bent and feet flat on the floor. Here’s the crucial part that most people miss: your feet should be about hip-width apart, and positioned so your fingertips can barely touch your heels when your arms are down at your sides.
Now, about those knees – aim for roughly a 90-degree bend. I used to have my students place them too far from their butt, which totally kills glute activation. Your knees should track directly over your ankles when you lift up, not wobble inward or outward.
Let’s talk breathing because this is where the magic happens. Take a deep breath into your belly before you lift. I teach my students to imagine filling up their belly like a balloon. As you exhale, press your lower back into the floor – this is what I call “finding your neutral spine.” This single tip has helped prevent countless cases of back strain.
Here’s my step-by-step process for the perfect bridge lift:
- Exhale and press lower back down
- Squeeze your glutes BEFORE you lift (huge game-changer!)
- Push through your heels, not your toes
- Lift your hips by rolling up through your spine, vertebra by vertebra
- Stop when your body forms a straight line from shoulders to knees
- Hold and breathe normally
Speaking of height – here’s a common mistake I see all the time. People try to lift their hips to the heavens! You actually want your body to form a straight ramp from your shoulders to your knees. I tell my students to imagine balancing a cup of water on their pelvis – if it would spill, you’re too high.
Let’s address some major form flaws I see regularly:
- Arching the lower back (this screams future back pain)
- Lifting the chin (keeps your neck tense)
- Pushing through the toes (bye-bye glute activation)
- Letting the knees cave in (hello, knee strain)
- Rising onto the upper back/shoulders (ouch!)
For neck tension (which I struggled with myself early on), keep your chin slightly tucked – like you’re holding a small orange between your chin and chest. Don’t turn your head to check your form; use your body’s feedback instead.
Here’s my secret sauce for mind-muscle connection: before you even start, place your hands on your glutes and consciously squeeze them. Feel that? That’s what you’re aiming for throughout the movement. I have my students practice this isometric hold before they ever lift a hip off the ground.
Now, let’s talk tempo because it matters more than you might think. Here’s what I recommend based on your goals:
Strength Building:
- 2 counts up
- 2 counts hold at top
- 4 counts down
- 1 count pause at bottom
Endurance:
- 1 count up
- 1 count hold
- 2 counts down
- No pause at bottom
Power Development:
- Explosive up (1 count)
- 1 count hold
- 2 counts down
- No pause
For maximum glute activation, here’s a cue that changed everything for my students: imagine squeezing a $100 bill between your cheeks – you wouldn’t want to drop that, right? This visual helps maintain tension throughout the movement.
When it comes to lower back protection, think about your pelvis as a bowl of water. As you lift, you don’t want to spill forward or backward. This helps maintain that crucial neutral spine position throughout the movement.
Remember, it’s better to do 5 perfect bridges than 50 sloppy ones. I always tell my students to start with shorter holds and fewer reps, focusing on absolutely perfect form. Once that becomes second nature, then we start adding complexity and volume.
One final tip that made a huge difference for my students: video yourself from the side. You might think you’re maintaining a straight line, but seeing yourself can be eye-opening. I do this check-in with my clients every few weeks to catch any form deterioration early.
Creating a Bridge Exercise Routine for Weight Loss
After years of designing workout programs, I’ve learned that a well-structured bridge routine can be a game-changer for weight loss. Let me share my most effective routines that I’ve developed through trial and error (and trust me, there was plenty of error in the beginning!).
Let’s start with my go-to beginner bridge workout. I call this the “Bridge Basics Burn,” and it’s perfect for those first 4-6 weeks:
Beginner Bridge Workout (20 minutes):
- Basic Glute Bridge: 3 sets of 12 reps (30 seconds rest between sets)
- Bridge Hold: 3 sets of 15 seconds (30 seconds rest)
- Marching Bridges: 2 sets of 16 total marches (45 seconds rest)
- Bridge Pulses: 2 sets of 20 (30 seconds rest)
For my intermediate folks who’ve mastered the basics, here’s what I call the “Bridge Blaster Circuit.” This one’s been a favorite among my clients:
Intermediate Bridge Routine (25 minutes):
- Elevated Bridges: 3 sets of 15
- Single-Leg Bridges: 2 sets of 12 each leg
- Weighted Bridges (light weight): 3 sets of 15
- Bridge Hold with March: 3 sets of 30 seconds
Rest 45 seconds between exercises, 60 seconds between rounds
Complete 3 rounds total
Now, for my advanced athletes looking to torch calories, I’ve developed this high-intensity bridge circuit:
Advanced Bridge Circuit (30 minutes):
- Weighted Elevated Bridges: 4 sets of 12 (heavy weight)
- Single-Leg Elevated Bridges: 3 sets of 15 each leg
- Plyometric Bridge Jumps: 3 sets of 10
- Banded Bridge Abductions: 3 sets of 20
- Bridge Complex (no rest between movements):
- 15 standard bridges
- 10 single-leg bridges each side
- 30 bridge pulses
- 30-second hold
Rest 60 seconds between exercises, 90 seconds between rounds
Complete 2-3 rounds
Here’s something crucial I’ve learned about structuring these within a full-body workout: place bridge exercises early in your routine when your glutes and core are fresh. I typically program them right after the warm-up but before any heavy lifting.
For optimal fat loss results, here’s my proven formula for sets and reps:
- Strength focus: 4 sets of 8-12 reps (heavier weight)
- Endurance focus: 3 sets of 15-20 reps (lighter weight)
- Metabolic focus: 2-3 sets of 30-50 pulses
Rest periods should be: - 30-45 seconds for basic movements
- 60-90 seconds for complex variations
- 2 minutes between circuits
Let’s talk progressive overload – this is where most people get stuck. Here’s my 8-week progression strategy:
Week 1-2: Focus on form with basic bridges
Week 3-4: Add elevation and single-leg variations
Week 5-6: Introduce light weights (10-15 lbs)
Week 7-8: Increase weight and complexity of movements
For weekly frequency, I’ve found the sweet spot is 3-4 bridge-focused sessions per week, with at least one full day of rest between sessions. Here’s my ideal weekly split:
Monday: Bridge strength focus
Tuesday: Rest or light cardio
Wednesday: Bridge endurance focus
Thursday: Rest or light cardio
Friday: Bridge metabolic circuit
Saturday/Sunday: One workout, one rest day
One thing I learned the hard way – don’t skip proper recovery! Signs you need more rest include:
- Decreased bridge height
- Lower back discomfort
- Inability to maintain proper form
- Persistent glute soreness
I’ve seen amazing results with clients who follow this structure consistently. One of my clients dropped 3 inches from her waist in 8 weeks just by adding these structured bridge workouts to her routine!
Remember to track your progress – either by noting the weights used, number of reps completed, or how long you can hold positions. This helps ensure you’re continuously challenging yourself and not hitting those dreaded plateaus.
Bridge Exercise Modifications for Different Fitness Levels
Let me tell you about my journey teaching bridge exercises to literally hundreds of students over the years. I’ve seen every fitness level imaginable, and let me tell you – there’s a bridge variation for everyone!
I’ll never forget my first time teaching bridges to a senior fitness class. Half my students looked at me like I was crazy when I suggested lying on the floor! That’s when I learned my first big lesson about modifications – you’ve got to meet people where they’re at.
For absolute beginners, start with the basic bent-knee bridge. Keep your feet flat on the floor about hip-width apart, and knees bent at roughly 90 degrees. The key here (and I learned this the hard way) is to start with just a tiny lift – maybe an inch or two off the ground. Hold for 5-10 seconds and lower down. Do this 8-10 times.
Now, for folks with knee issues – and boy, do I see a lot of those – wall bridges can be a game changer. Stand about a foot away from the wall, lean back against it, and slowly slide down until your thighs are parallel to the ground. It’s like doing a bridge vertically! The wall supports your body weight, taking pressure off those sensitive knees.
For my pregnant mamas (always with doctor’s approval, of course), I recommend the supported bridge. Grab a firm pillow or yoga block and place it under your hips. This gives you a stable base and prevents overarching the back. Never go beyond what feels comfortable – pregnancy isn’t the time to push limits.
Let’s talk about my more advanced exercisers. Once you’ve mastered the basic bridge, try single-leg variations. Start by extending one leg straight while keeping the other bent. Lift and lower using just one leg for support. Fair warning – this is harder than it looks! I’ve seen plenty of wobbly attempts (including my own when I first tried teaching it).
For seniors or those with limited mobility, chair bridges are fantastic. Sit at the edge of a sturdy chair, feet flat on the floor. Push through your heels to lift your hips slightly off the chair. Even this small movement strengthens those glute muscles!
Here’s a quick progression guide I’ve developed over years of teaching:
- Level 1: Supported bridges with pillow
- Level 2: Basic bent-knee bridges
- Level 3: Full bridges with extended hold times (30+ seconds)
- Level 4: Single-leg bridges
- Level 5: Elevated bridges (feet on a step or bench)
For those recovering from injuries (and please, always work with your physical therapist), isometric holds can be super helpful. These are gentle contractions where you’re not actually lifting – just engaging the muscles. Start with 5-second holds and gradually increase duration.
One mistake I made early in my teaching career was pushing people too fast through progressions. Trust me, mastering the basics is crucial. I’ve seen too many folks try advanced variations before they’re ready and end up frustrated or, worse, injured.
Remember, the “perfect” bridge position looks different for everyone. Focus on what feels right for your body rather than trying to match someone else’s form. And if you’re dealing with any back pain or discomfort, stop and check in with a healthcare provider – better safe than sorry!
Conclusion:
Bridge exercises are far more than just a simple bodyweight movement—they’re a legitimate fat-burning, muscle-building weapon in your weight loss arsenal! From activating multiple muscle groups simultaneously to creating that coveted afterburn effect that keeps your metabolism elevated for hours, bridges deliver impressive results without requiring fancy equipment or gym memberships. The best part? You can start right now, right where you are, regardless of your fitness level.
Remember, consistency trumps perfection every single time. Start with the basic glute bridge, master your form, and progressively challenge yourself with more advanced variations as you get stronger. Combine your bridge routine with a balanced nutrition plan and complementary exercises, and you’ll be amazed at the transformation your body undergoes. Your stronger, leaner, more confident self is just a bridge away—so what are you waiting for? Get on that mat and start lifting those hips today!